How To Find Serial Port On Mac For Putty
Some of the projects and tutorials here will allow you to use a serialport to interact with your Mynewt project. While most modern PCs andlaptops no longer have a true serial port, almost all can use their USBports as serial ports.
You can find your Arduino via Terminal with ls /dev/tty. Then you can read that serial port using the screen command, like this screen /dev/tty.
This page will show you how to connect to some of the development boards weuse via a serial port.
- Using a USB to Serial Breakout Board
- Setup Serial Communications
The nRF52DK can communicate via a serial port directly through its USB port. By default, it uses the UART onboard, so if you need to use the UART for other purposes, consider using a USB<–>Serial converter or the Segger RTT Console instead, instructions provided below.
To see your device, check the USB devices that are connected to your computer (macOS):
The /dev/cu.usbmodem#### and /dev/tty.usbmodem#### represent your device. To get console access, you can either use the screen command or Minicom:
If you need to use an external USB to Serial converter, this guide will show you how to set it up. The development boards covered here are:
- Nordic Semiconductor nRF52dk
- Arduino M0 Pro
For this tutorial, we’ll be using the AdaFruit FT232H BreakoutBoard, but almostany similar board should work just as well. You will also need Minicomor a similar Serial communications application. We’ll show you how touse the screen command built in to Mac OS X, but later tutorialswill also show Minicom setup.
This is a great board because it’s so easy to set up, and it can doSerial UART, SPI, I2C and GPIO as well. There’s full documentation onthe boardherebut we’re only covering the wiring for the Serial UART.
Start by connecting a jumper wire to Pin D0. This will be the UART Txpin, which we’ll then connect to the Rx pin on the Development Board.
Next connect a jumper wire to pin D1. This will be the UART Rx pin,which we’ll connect to the Tx pin on the development board.
Finally connect a jumper wire to the GND pin. Golf with friends unblocked.
It should look like this:
On the NRF52DK developer kit board, the Rx pin is P0.08, so you’llattach your jumper wire from the Tx pin (D0) of the FT232H board here.
The TX Pin is pin P0.06, so you’ll attache the jumper wire from the RxPin (D1) on the FT232H board here.
Finally, the GND wire should go to the GND Pin on the NRF52DK. Whenyou’re done, your wiring should look like this:
On the Arduino M0 Pro, the Tx and Rx pins are clearly labeled as such,as is the GND pin. Just make sure you wire Rx from the FT232H to TX onthe M0 Pro, and vice-versa.
Your Arduino M0 Pro should look like this:
You will need to know the serial port to connect to and use a terminalprogram to connect to the board.
First check what USB devices are already connected before connecting theFT232H board to your computer. The ports are listed in the /devdirectory and the format of the port name is platform dependent:
- Mac OS uses the format
tty.usbserial-<someidentifier>. - Linux uses the format
TTYUSB<N>, whereNis a number. Forexample, TTYUSB2.
This example is run on a Mac OS system.
Check what USB devices are already connected:
Plug in the FT232H board and check the ports again:
The FT232H is connected to /dev/tty.usbserial-0020124 (The numberafter tty.usbserial will be different on your machine.) Use the screencommand to connect to the board:
To exit out of screen you’ll type control-A followed bycontrol- and you’ll be back to a terminal prompt.
You can also use minicom:
If there’s no Mynewt app running, or the Mynewt app doesn’t have theShell and Console enabled, you won’t see anything there, but you canalways refer back to this page from later tutorials if you need to.
First check what USB devices are already connected before connecting theFT232H board to your computer. You can locate the ports from a MinGWterminal or use the Windows Device Manager.
On a MinGW terminal, the ports are listed in the /dev directory and theformat of the port name is ttyS<N> where N is a number. You must mapthe port name to a Windows COM port: /dev/ttyS<N> maps toCOM<N+1>. For example, /dev/ttyS2 maps to COM3.
Check what USB devices are already connected:
/dev/ttyS5 maps to the Windows COM6 port. You can run Windows DeviceManager to confirm:
Plug in the FT232H board and check the ports again:
The FT232H board is connected to port /dev/ttyS10 (or COM11):
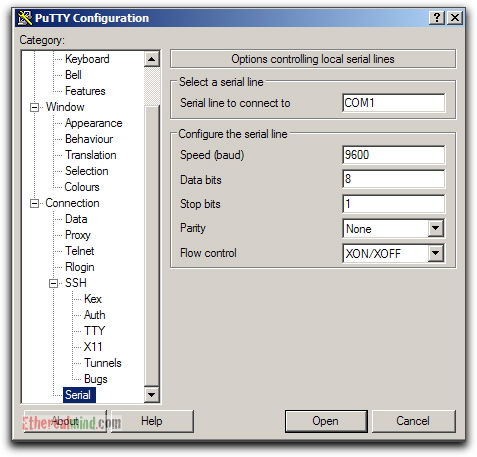
We use the PuTTY terminal application to connect to the board on theCOM11 port:
Press Open and you should get a terminal screen titled “COM11 - PuTTY”
If there’s no Mynewt app running, or the Mynewt app doesn’t have theShell and Console enabled, you won’t see anything there, but you canalways refer back to this page from later tutorials if you need to.
Now that you know how to communicate with your Mynewt application, let’smove on to creating one!
Connecting to the serial console on Mac and Linux uses essentially the same process. Neither operating system needs drivers installed. On MacOSX, Terminal comes installed. On Linux, there are a variety such as gnome-terminal (called Terminal) or Konsole on KDE.
First you'll want to find out which serial port your board is using. When you plug your board in to USB on your computer, it connects to a serial port. The port is like a door through which your board can communicate with your computer using USB.
We're going to use Terminal to determine what port the board is using. The easiest way to determine which port the board is using is to first check without the board plugged in. On Mac, open Terminal and type the following:
ls /dev/tty.*
Each serial connection shows up in the /dev/ directory. It has a name that starts with tty.. The command ls shows you a list of items in a directory. You can use * as a wildcard, to search for files that start with the same letters but end in something different. In this case, we're asking to see all of the listings in /dev/ that start with tty. and end in anything. This will show us the current serial connections.
For Linux, the procedure is the same, however, the name is slightly different. If you're using Linux, you'll type:
ls /dev/ttyACM*
The concept is the same with Linux. We are asking to see the listings in the /dev/ folder, starting with ttyACM and ending with anything. This will show you the current serial connections. In the example below, the error is indicating that are no current serial connections starting with ttyACM.
Now, plug your board. Using Mac, type:
ls /dev/tty.*
This will show you the current serial connections, which will now include your board.
Using Mac, a new listing has appeared called /dev/tty.usbmodem141441. The tty.usbmodem141441 part of this listing is the name the example board is using. Yours will be called something similar.

Using Linux, type:
ls /dev/ttyACM*
This will show you the current serial connections, which will now include your board.
Using Linux, a new listing has appeared called /dev/ttyACM0. The ttyACM0 part of this listing is the name the example board is using. Yours will be called something similar.
Now that you know the name your board is using, you're ready connect to the serial console. We're going to use a command called screen. The screen command is included with MacOS. Linux users may need to install it using their package manager. To connect to the serial console, use Terminal. Type the following command, replacing board_name with the name you found your board is using:
screen /dev/tty.board_name 115200
The first part of this establishes using the screen command. The second part tells screen the name of the board you're trying to use. The third part tells screen what baud rate to use for the serial connection. The baud rate is the speed in bits per second that data is sent over the serial connection. In this case, the speed required by the board is 115200 bits per second.
Press enter to run the command. It will open in the same window. If no code is running, the window will be blank. Otherwise, you'll see the output of your code.
Great job! You've connected to the serial console!
If you try to run screen and it doesn't work, then you may be running into an issue with permissions. Linux keeps track of users and groups and what they are allowed to do and not do, like access the hardware associated with the serial connection for running screen. So if you see something like this:
then you may need to grant yourself access. There are generally two ways you can do this. The first is to just run screen using the sudo command, which temporarily gives you elevated privileges.
Once you enter your password, you should be in:
The second way is to add yourself to the group associated with the hardware. To figure out what that group is, use the command ls -l as shown below. The group name is circled in red.
Then use the command adduser to add yourself to that group. You need elevated privileges to do this, so you'll need to use sudo. In the example below, the group is adm and the user is ackbar.
After you add yourself to the group, you'll need to logout and log back in, or in some cases, reboot your machine. After you log in again, verify that you have been added to the group using the command groups. If you are still not in the group, reboot and check again.
And now you should be able to run screen without using sudo.
And you're in:
The examples above use screen, but you can also use other programs, such as putty or picocom, if you prefer.