Wifi Frequency Checker
For the best possible wireless internet connection it's important the signal is as strong and stable as possible. A weak or intermittent signal will lead to slowness or dropouts. Here are 5 tools to monitor your Wifi signal strength over a period of time. You can check whether your computer can use this faster frequency by following the tutorial below. The 2.4Ghz network is, at this moment, the standard used for.
A Step-by-Step Guide
Nowadays, pretty much everyone has a wireless network connection set up at home. Your router’s wireless access point is connected to a certain channel, which connects you to a Wi-Fi network.
That said, if you live in an apartment building or densely populated area, you might experience frequent network timeouts, disconnection issues or an overall slow internet speed.
These issues are often caused by the large number of people attempting to connect to the internet, causing an overload of wireless signals using the same network channel.
In order to get the best possible Wi-Fi connection in your area, you’ll have to switch to a channel that either has no other users (or significantly fewer users) than the current channel you’re using.
In this step-by-step guide, I will show you how to improve your Wi-Fi connection by finding the best Wi-Fi channel for your router, for both PC and cell phone. I will then instruct you on how to set up your router in order to tune into that channel.
Let’s get started.
When you want to find the best Wi-Fi channel, you’ll have to consider two important numbers.
Check for the “RSSI” and “Noise” values.
RSSI stands for “Received Signal Strength Indicator.” It tells you how strong the connection between your device and a router is.
Noise, also “Noise Floor,” is the sum of all the noise sources and unwanted signals within the connection range. In this case, “Noise” stands for the number of other signals that might interfere with the signal being monitored.
Both values are always in negative numbers.
For RSSI, you’ll have to check for the highest number (the higher, the better). But, because they’re negative, it’s important to remember that “higher” will mean as close to zero as possible. For example, an RSSI of -45 is better compared to an RSSI of -70.
On the other hand, for “Noise,” you’ll need to look for the lowest number. Again, because these numbers are negative, the lowest number would be the one that’s farthest from zero. For example, -95 is better than -88.
To complete the calculation, we want to measure the difference between these two values. This is called the “SNR” - which stands for “Signal-to-Noise Ratio.”
Simply subtract the value of “Noise” from the “RSSI” value to get the SNR value.
For example, channel 13 has an RSSI of -49 and the noise is -95.
So, to calculate the SNR: (-49) - (-95) = SNR of 46.
Ideally, you want to have a high SNR ratio. The higher this number is, the better the Wi-Fi connection.
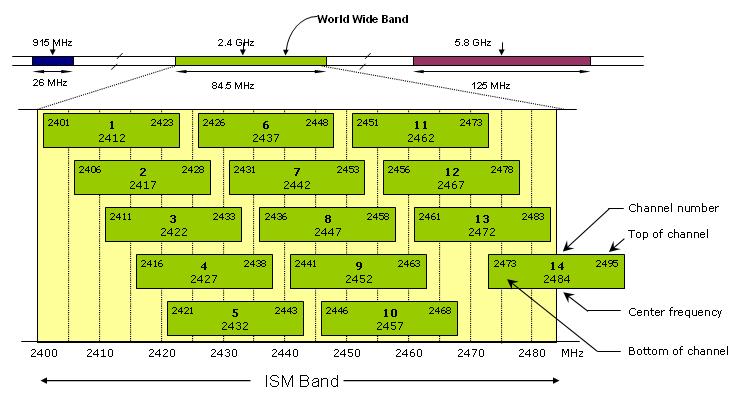
The major difference between a 2.4 GHz and a 5 GHz wireless connection is the range and bandwidth.
A 5 GHz wireless connection will provide a faster connection, which is most effective at covering shorter distances.
A 2.4 GHz wireless connection is more effective at covering farther distances, but might do so at a lower speed.
Note: a 5 GHz connection isn’t nearly as good as a 2.4 GHz connection at penetrating objects and walls. Also, in a densely-populated Wi-Fi area, it’s better to have a 2.4 GHz connection because “Noise” has more influence on a 5 GHz wireless connection.
See also: 8 best Wifi stumblers for Windows and Mac
The first thing you have to do is scan your area to identify all the available Wi-Fi networks. You can do that by running the “Network Diagnostics” on your Mac.
Follow the step-by-step explanation below:
Step #1 - Hold the “option” (alt) key and move your mouse to the top-right of your screen. Click the Wi-Fi connection icon.
Download Yuvraj Singh 6 Sixes T20 Wc 07 3GP Video to your mobile phone or tablet for free, in 3gp, uploaded by nishitsabnis in Sport. Get Free 3GP Videos downloads like Yuvraj Singh 6 Sixes T20 Wc 07 & send to your phone. Yuvrajshing 6 ball pe 6 six.mp3 video.download. Download Yuvraj Singh 6 six sixes in 6 six balls video in mp4 3gp mobile formats. Games; Ad; Yuvraj Singh 6 six sixes in 6 six balls Video - mp4 3gp Download. Duration: 6:10. Download Video. Download mp4 Video (Smartphone 640x360 360p HQ) Download 3gp Video (Mobile. Top 10 Best First Ball Wickets in Cricket Video - mp4. Herschelle Gibbs 6 Sixes In 6 Balls - Before Yuvraj Singh 6 Sixes In 6 Balls Cricket Mania-111. Sports Academy. Herschelle gibbs 6 sixes in 6 balls Before Yuvraj Singh 6 sixes in 6 balls. Yuvraj Singh 6 Sixes In Six Balls Against T20 England In World Cup. 6 ball pe 6 six Marne wale pahle wale ban Gaye. 6 ball pe 6 six Marne wale pahle wale ban Gaye. Skip navigation Sign in. This video is unavailable.
Step #2 - Find “Open Wireless Diagnostics” in the drop-down menu.
Step #3 - A new window called “Wireless Diagnostics” will open.
Note:ignore this window. Instead, click on “Window” in your title bar and tap “Scan” in the drop-down menu.
Step #4 - The next window you will see is an overview of all the Wireless Access Points in range of your router.
Step #5 - In order to refresh the overview, tap “Scan Now.”
Step #6 - The diagnostics summary provides an overview of the analysis and which Wi-Fi channel is the best in the area for your router.
In the example, there are 9 networks in total. The summary box indicates that the best 2.4 GHz network available is channel 11.
However, if we take a closer look at the data in the image below, we can draw a different conclusion. For some reason, after I clicked “Scan Now,” channel 11 was no longer available on the list, likely due to an error. Hopefully, this is not something you’ll need to worry about.
Therefore, you’ll need to calculate the best SNR level to determine the best available channel.
For the SNR calculation, you need two data points.
Now, we calculate the sum of those two values: (-46) - (-99) = SNR of 53.
So, the SNR is 53, which makes channel 13 the best.
Note: you can also use a Wi-Fi scanner tool instead of the Wireless Diagnostics Scan.
Wi-Fi Scanner is a good tool, but it’s priced at $19.99 in the App Store. NetSpot is a free tool to scan for wireless networks in your area, and it has a multifunctional discover mode with visual graphs.
There are various software tools available for your Windows machine in order to figure out which Wi-Fi channel in your area is the best. You can find a few free software applications below:
- NetSpot, compatible with Windows 7, 8 and 10.
- Acrylic WiFi, compatible with Windows 7, 8 and 10.
- WiFi Analyzer, available in the Microsoft Store.
- WiFi Commander, exclusively for Windows 10.
All the Wi-Fi scanners listed above are powerful tools to scan your network area.
For the sake of this example I will go with WiFi Analyzer, because it’s easy to use and has a neat interface.
Step #1 - Go to the online Microsoft Store.
Step #2 - When you’re in the Microsoft Store, tap “Get the App” to start the download.
Step #3 - Install the application on your Windows machine. When the installation is completed, open the application.
Download snoop lion no guns allowed free mp3. Snoop Lion Money makes a man and that's a crime If we all were rich, we'd spend more time With our daughters and sons, they're losing their minds We all feel hurt, here's mine, hear me now Cause, no guns are allowed, in here tonight We're gonna have a free-for-all, no fights I wanna get lost in the crowd, in here tonight I need to hear my thoughts, turn the music up loud Let the music.
Step #4 - When you open WiFi Analyzer, you’ll see its dashboard.
On the right side, you can select extra filters. I recommend not changing the default settings. The last 3 options are rather advanced options, which are not applicable for now.
The current channel of each connection is stated below the network’s name.
Step #5 - Click on “Analyze” in the dashboard. You will see a graph with visuals, indicating what networks are performing best and worst.
Below the graph, WiFi Analyzer leaves a recommendation based on the scan results. If the graph is too confusing, look to the bottom left - you’ll see the word “Recommend.” The channel noted below will be the optimal Wi-Fi channel to connect to. In this example, the tool recommends using channel 13.
However, we can also draw a different conclusion here. As we know, the closer RSSI is to 0, the better.
So, that makes CH1 (matthafner.com) the best channel, because -60 is closest to 0 of all the available Wi-Fi networks in the list.
Note:the term “dBm” stands for RSSI - signal strength. As mentioned before, the closer to 0, the better.
How to Find the Best Wi-Fi Channel With Linux Command Line
Linux users have two options when it comes to detecting Wi-Fi channels: you can either run a command line in Terminal, or you can choose to download a more visually-enhanced tool, like WiFi Radar.
Installing software tools on Linux always takes a bit more effort compared to Windows and Mac. So, I recommend using the Terminal utility to scan for the best Wi-Fi network channel in your area.
Launch the Terminal and enter the following command line:
sudo iwlist wlan0 scan grep Frequency sort uniq -c sort -n
Example output would look like this:
The command line groups the results, so you can see how much each channel is used. The “sort -n” command will rank the channels in order of fastest to slowest: in this example, channel 3 is ranked first.
Earlier in this guide, I recommended Wifi Analyzer for Windows users. I also recommend this tool for Android users, because the tool is also compatible and available for mobile devices.
Step #1 - Download and install Wifi Analyzer in the Play Store.
Step #2 - Launch the app to open the dashboard.
In the example, channel 11 appears to have the best statistics.
Step #3 - Check the dBm (signal strength) and the graph to visually compare all the available networks.
Apple designed the architecture of iPhones in such a way that applications can’t communicate with each other, because strict security reasons prevent that.
Therefore, it’s impossible to perform a performance analysis of your Wi-Fi network with an iPhone.
It’s only possible if you jailbreak your iPhone, but to avoid that hassle, I highly recommend following one of the other options mentioned above to discover which channel is best for you.
That way, once you adjust your router (explained below), you can connect to the new channel - no fancy footwork with the iPhone necessary.
How to Change Your Router Settings to the Best Wi-Fi Channel
So, by now, you should have been able to successfully identify the best Wi-Fi channel in your area based on the signal strength, least users on a channel and width (2.4 GHz or 5 GHz).
Follow the next steps to enjoy a faster Wi-Fi connection:
Step #1 - Log into your router’s main dashboard.
If you don’t know how to log into your router’s dashboard, read my post for further instructions. Scroll down to the “Use the Data to Configure Router Settings” section to follow the steps.
Step #2 - When you have successfully logged into your router’s dashboard, tap “Settings.” Under settings, find “Wi-Fi” or “Wireless.”
Step #3 - Next, it’s time to change the “Wi-Fi Channel.” Simply select the little arrow to fold out the drop-down menu and select the recommended channel based on your network analysis.
You have the possibility to select either the 2.4 GHz or 5 GHz channel. Remember, it’s only advantageous to go for a 5 GHz Wi-Fi channel if you live in a less-congested Wi-Fi network area, without any objects blocking the signal.
That’s all for now!
By following the steps above, you should be able to reach the full potential of your Wi-Fi network - especially if you live in a densely-congested Wi-Fi network area.
It would be a shame to suffer from annoyingly-slow internet speed. Connecting to a faster available Wi-Fi channel will provide the solution.
I hope you’ll enjoy a faster internet connection after reading this guide. Happy browsing!
Wireless internet is everywhere these days and you could have several WiFi capable devices connected to your own wireless network. Because of that it’s important the WiFi router is placed in the best available location to give the longest range and strongest signal to as many devices as possible. If the router is placed in a poor location the signal could be weak, intermittent or cause constant dropouts.
There are many factors that can affect the quality and strength of a WiFi network connection. These include walls, floors, ceilings, electrical appliances, anything emitting radiation or electromagnetism, and of course distance to the router. Windows and most bundled WiFi software allows you to see how good the current wireless signal is. To get a better idea how the signal is behaving and whether it gets affected by other factors it’s a good idea to monitor the signal strength over a period of time.
Watching how your WiFi signal behaves over several minutes or even hours could help identify if the current location for it is ideal or causing problems. Here we list 5 free tools that show a graph for your wireless signal so you can watch it over a period of time to see how it behaves.
1. NetSpotNetSpot is a free wireless network signal analysis and troubleshooting tool available for both Mac and Windows computers. In addition to a standard WiFi discovery and monitoring section it also has a site survey feature that allows for the relative network signal strengths to be plotted onto a map of your building or local area.
The program starts in Discover mode which shows available wireless networks along with some general statistics. Double click on the target network to open the details window. This has a Signal tab which shows a graph of the signal strength over a period of time, the last 5, 30, or 60 minutes can be shown in the window at once. Also available is a Tabular Data window that shows the same data as the graph but in text form.
The frequency of the signal strength scanning can be either left at the default of 5 seconds or changed to 10, 30 or 60 seconds. Do be aware that NetSpot crashed for us on first run but appeared to work fine after a system reboot.
Download NetSpot
2. inSSIDer
The sad thing about inSSIDer is it stopped being free and became a shareware application from version 3 onwards. Luckily version 2 remains free and open source although it’s not had any updates since 2012 and compiled versions with the free source code are a bit hard to find.
After installing and running the program click the Time Graph tab to see the signal strength graphs for all found wireless networks. Uncheck those you don’t want to appear in the graph display to be left with the signals to be monitored. The display shows signal strength over a period of 5 minutes and any selected SSID will be shown in bold. Although you cannot view the signal for more than the 5 minutes you can right click on the graph and copy an image of it to the clipboard for a snapshot record. This can in turn be pasted into a paint program.
Download inSSIDer 2.1
3. Homedale
Homedale has a big advantage over the other tools here because it’s the only one that is completely portable, which many people prefer. The program is well laid out and easy to use. Besides the signal graphs you can also get your location at the click of a button from a mapping service such as Google.
Monitoring a wireless network is a simple case of going into the Access Points tab and double clicking on the access point. Its icon will turn red to signify it has been selected and you will be shown the current signal strength graph. The graph itself refreshes every 2 seconds by default and shows about 20 minutes worth of signal history. The refresh rate can be changed from the Options tab to 1, 5, 10, 30 or 60 seconds. Right click to save the current graph as an image or start logging the history data to a text file.
Homedale also supports a few command line switches so you can launch it to start monitoring and logging a specified network automatically. Use /? in a Command Prompt to get a list of arguments that can be used. For example the following will create a log.txt and add a signal strength entry every 3 seconds for the SSID Raymondcc_WiFi.
Homedale -s Raymondcc_WiFi -l log.txt -r 3000
Download Homedale
4. Acrylic Wi-Fi Home
The Home version of Acrylic Wi-Fi is free for personal use and has enough to show a signal strength graph for monitoring or troubleshooting. One useful feature missing and only available in the paid Pro version is the ability to alter the timeline of the signal strength graph from the default of 5 minutes to 1, 3 or 10 minutes.
On install and launch click Options (3 horizontal lines) and choose Advanced Mode to make the graph full width and remove the useless Pro only network quality pane. To remove a wireless network from the graph click on the color block to the left of its name in the SSID list. The graph is colored into good and not so good strengths, highlighting an SSID will bold it for easier viewing, Microsoft .NET 4.5 is required which will need to have been installed on Windows 7 or Vista. Visual C++ 2012 Redistributables are also required.
Download Acrylic Wi-Fi Home

5. Vistumbler
This tool has a few quite advanced options such as GPS support, live Google Earth tracking and a number of experimental features. More standard functions include getting WiFi signal strength and information as well as the ability to audibly speak out the signal strength to you.
You don’t really have to do much to get the strength information after installation, simply click Scan APs and click on Graph 1 or Graph 2. Then click on a wireless network in the list to populate the graphs. The first is a simple line that measure signal strength over a few minutes. The second is a bar graph (pictured above) which shows the signal strength history for around 11 minutes. Changing the Refresh loop in Settings > Misc Settings to another value from the default of 1000ms (1 second) will lengthen or shorten the graph history time.
Download Vistumbler
We did also look at Xirrus WiFi Inspector and NetSurveyor although both don’t log wireless signals for very long. Xirrus also requires you to fill in an online form to get the download link from the website.
You might also like:
5 Tools to Check if Someone is Using my Wireless Network (WiFi)8 WiFi Scanners to Discover Hidden Wireless Networks6 Ways to Import and Export Wireless Network Profile Settings4 Ways to Automatically Disable Wireless Network Connection when Local Area Connection is Enabled5 Tools To Get Back a Windows Network Indicator IconTried netspot inssider and homedale. It seems that homedale is the only one who will log signal stregth for long period of times (indefinitely?) in the log file.
Go to access points and double click your router
go to access point graph right click and ask to log, you need to specify a file name
The log file is very simple and has the format yy-mm-dd hh:mm:ss: .
you can select the whole text, past it to, say, google sheets and write in an empty cell the formula =min(b:b), it’ll show the min power value of the log file
Homedale create a file named oui.txt inside its residing folder which is very annoying.
Every time you close the program you have to delete this file manually, it consumes
about 2M of disk space.
Thanks looks well done and there are some other nice utilities at the site.
ReplyThaks for good Proggy
Reply